wordpresstr
Administrator
- 125
- 13 Kas 2020
Bu özellik tam olarak ne yapacak?
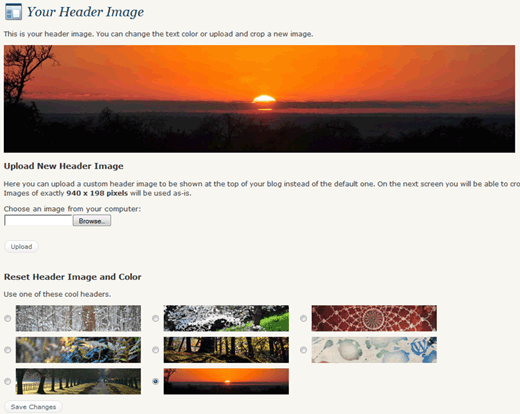
Yönetici panelinizde başlık resimlerini değiştirmenize izin verecek bir sekme oluşturacaktır. Bir tema tasarımcısıysanız, kullanıcılara daha fazla seçenek sunmak için varsayılan görüntüleri kaydedebilirsiniz. Ayrıca, kullanıcıların başlık için özel resimler yüklemesine olanak tanır. Son fakat kesinlikle en az değil, bu özellik tek yazı sayfalarında gönderi küçük resimlerini kullanır. Gönderi küçük resminiz başlık boyutuna sığacak kadar büyükse, başlık olarak varsayılan görüntü yerine gönderi küçük resminizi kullanır. Küçük resminiz daha büyükse, sizin için kırpacaktır.
Bu nasıl eklenir?
Kodu doğrudan Twenty Ten'in functions.php dosyasından aldık . Aşağıdaki kodları temanızın functions.php dosyasına yapıştırmanız gerekir .
Bu benim için abartılı. Lütfen açıkla
Elbette, bu bazılarınıza şakacı görünebilir. Bu çoğunlukla tema tasarımcıları içindir, ancak onu ayrıştırmak için elimizden gelenin en iyisini yapacağız. Başlamadan önce, gerekli değişiklikleri yapabilmeniz için bu kodu kod düzenleyicinize kopyalayıp yapıştırdığınızdan emin olun.
Not: Varsayılan başlık görsellerinizi saklayacağınız dizin olarak / images / headers / kullanıyoruz.
Temanıza eklenecek kod
Bu kod büyük olasılıkla temanın header.php dosyasına girecektir . Onu istediğiniz gibi şekillendirebilirsiniz.
Bu kod ne yapıyor?
Yönetici panelinizde başlık resimlerini değiştirmenize izin verecek bir sekme oluşturacaktır. Bir tema tasarımcısıysanız, kullanıcılara daha fazla seçenek sunmak için varsayılan görüntüleri kaydedebilirsiniz. Ayrıca, kullanıcıların başlık için özel resimler yüklemesine olanak tanır. Son fakat kesinlikle en az değil, bu özellik tek yazı sayfalarında gönderi küçük resimlerini kullanır. Gönderi küçük resminiz başlık boyutuna sığacak kadar büyükse, başlık olarak varsayılan görüntü yerine gönderi küçük resminizi kullanır. Küçük resminiz daha büyükse, sizin için kırpacaktır.
Bu nasıl eklenir?
Kodu doğrudan Twenty Ten'in functions.php dosyasından aldık . Aşağıdaki kodları temanızın functions.php dosyasına yapıştırmanız gerekir .
| 1 2 3 4 5 6 7 8 9 10 11 12 13 14 15 16 17 18 19 20 21 22 23 24 25 26 27 28 29 30 31 32 33 34 35 36 37 38 39 40 41 42 43 44 45 46 47 48 49 50 51 52 53 54 55 56 57 58 59 60 61 62 63 64 65 66 67 68 69 70 71 72 73 74 75 76 77 78 79 80 81 82 83 84 85 86 87 88 89 90 91 92 93 94 95 96 97 98 | <?php /** Tell WordPress to run yourtheme_setup() when the 'after_setup_theme' hook is run. */ add_action( 'after_setup_theme', 'yourtheme_setup' ); if ( ! function_exists('yourtheme_setup') ): /**
* @since 3.0.0 */ function yourtheme_setup() { // This theme uses post thumbnails add_theme_support( 'post-thumbnails' ); // Your changeable header business starts here define( 'HEADER_TEXTCOLOR', '' ); // No CSS, just IMG call. The %s is a placeholder for the theme template directory URI. define( 'HEADER_IMAGE', '%s/images/headers/forestfloor.jpg' ); // The height and width of your custom header. You can hook into the theme's own filters to change these values. // Add a filter to yourtheme_header_image_width and yourtheme_header_image_height to change these values. define( 'HEADER_IMAGE_WIDTH', apply_filters( 'yourtheme_header_image_width', 940 ) ); define( 'HEADER_IMAGE_HEIGHT', apply_filters( 'yourtheme_header_image_height', 198 ) ); // We'll be using post thumbnails for custom header images on posts and pages. // We want them to be 940 pixels wide by 198 pixels tall (larger images will be auto-cropped to fit). set_post_thumbnail_size( HEADER_IMAGE_WIDTH, HEADER_IMAGE_HEIGHT, true ); // Don't support text inside the header image. define( 'NO_HEADER_TEXT', true ); // Add a way for the custom header to be styled in the admin panel that controls // custom headers. See yourtheme_admin_header_style(), below. add_custom_image_header( '', 'yourtheme_admin_header_style' ); // … and thus ends the changeable header business. // Default custom headers packaged with the theme. %s is a placeholder for the theme template directory URI. register_default_headers( array ( 'berries' => array ( 'url' => '%s/images/headers/berries.jpg', 'thumbnail_url' => '%s/images/headers/berries-thumbnail.jpg', 'description' => __( 'Berries', 'yourtheme' ) ), 'cherryblossom' => array ( 'url' => '%s/images/headers/cherryblossoms.jpg', 'thumbnail_url' => '%s/images/headers/cherryblossoms-thumbnail.jpg', 'description' => __( 'Cherry Blossoms', 'yourtheme' ) ), 'concave' => array ( 'url' => '%s/images/headers/concave.jpg', 'thumbnail_url' => '%s/images/headers/concave-thumbnail.jpg', 'description' => __( 'Concave', 'yourtheme' ) ), 'fern' => array ( 'url' => '%s/images/headers/fern.jpg', 'thumbnail_url' => '%s/images/headers/fern-thumbnail.jpg', 'description' => __( 'Fern', 'yourtheme' ) ), 'forestfloor' => array ( 'url' => '%s/images/headers/forestfloor.jpg', 'thumbnail_url' => '%s/images/headers/forestfloor-thumbnail.jpg', 'description' => __( 'Forest Floor', 'yourtheme' ) ), 'inkwell' => array ( 'url' => '%s/images/headers/inkwell.jpg', 'thumbnail_url' => '%s/images/headers/inkwell-thumbnail.jpg', 'description' => __( 'Inkwell', 'yourtheme' ) ), 'path' => array ( 'url' => '%s/images/headers/path.jpg', 'thumbnail_url' => '%s/images/headers/path-thumbnail.jpg', 'description' => __( 'Path', 'yourtheme' ) ), 'sunset' => array ( 'url' => '%s/images/headers/sunset.jpg', 'thumbnail_url' => '%s/images/headers/sunset-thumbnail.jpg', 'description' => __( 'Sunset', 'yourtheme' ) ) ) ); } endif; if ( ! function_exists( 'yourtheme_admin_header_style' ) ) : /** * Styles the header image displayed on the Appearance > Header admin panel. * * Referenced via add_custom_image_header() in yourtheme_setup(). * * @since 3.0.0 */ function yourtheme_admin_header_style() { ?> <style type="text/css"> #headimg { height: <?php echo HEADER_IMAGE_HEIGHT; ?>px; width: <?php echo HEADER_IMAGE_WIDTH; ?>px; } #headimg h1, #headimg #desc { display: none; } </style> <?php } endif; ?> |
Bu benim için abartılı. Lütfen açıkla
Elbette, bu bazılarınıza şakacı görünebilir. Bu çoğunlukla tema tasarımcıları içindir, ancak onu ayrıştırmak için elimizden gelenin en iyisini yapacağız. Başlamadan önce, gerekli değişiklikleri yapabilmeniz için bu kodu kod düzenleyicinize kopyalayıp yapıştırdığınızdan emin olun.
Not: Varsayılan başlık görsellerinizi saklayacağınız dizin olarak / images / headers / kullanıyoruz.
- Yourtheme_setup () işlevini oluşturarak kodu başlatırsınız.
- 21. satırda varsayılan başlık resmini tanımlıyoruz. Temelde tema dizini URI'si için bir yer tutucu olan bir değişken% s vardır.
- 25 ve 26. satır, görüntünün genişliğini ve yüksekliğini tanımladığınız yerdir. Varsayılan olarak 940 piksel genişliğe ve 198 piksel yüksekliğe ayarlanmıştır. Bu iki satırı düzenleyerek değiştirebilirsiniz.
- 42. satırdan başlayarak, varsayılan başlıkları kaydetmeye başlıyoruz. Bunlar, yönetici panelinizde bir radyo düğmesi seçeneği olarak görünecek resimlerdir. Daha fazla seçeneğe ihtiyacınız varsa, kullanılan formatı izlemeniz yeterlidir.
- 95. satırda başlık stilini seçiyoruz. Bu ayarları değiştirmenize gerek yoktur çünkü bunları zaten 25. ve 26. satırlarda tanımlamışsınızdır.
Temanıza eklenecek kod
Bu kod büyük olasılıkla temanın header.php dosyasına girecektir . Onu istediğiniz gibi şekillendirebilirsiniz.
| 1 2 3 4 5 6 7 8 9 10 11 | <?php // Check if this is a post or page, if it has a thumbnail, and if it's a big one if ( is_singular() && has_post_thumbnail( $post->ID ) && ( /* $src, $width, $height */ $image = wp_get_attachment_image_src( get_post_thumbnail_id( $post->ID ), 'post-thumbnail') ) && $image[1] >= HEADER_IMAGE_WIDTH ) : // We have a new header image! echo get_the_post_thumbnail( $post->ID, 'post-thumbnail' ); else : ?> <img src="<?php header_image(); ?>" width="<?php echo HEADER_IMAGE_WIDTH; ?>" height="<?php echo HEADER_IMAGE_HEIGHT; ?>" alt="" /> <?php endif; ?> |
Bu kod ne yapıyor?
- Birincisi, tek bir gönderi mi yoksa bir sayfa mı olduğunu kontrol ediyor. Ayrıca bu gönderinin / sayfanın bir küçük resmi olup olmadığını ve yeterince büyük olup olmadığını kontrol eder.
- Sayfa tek bir sayfaysa ve yeterince büyük bir küçük resme sahipse, o gönderiye özel gönderi küçük resmini görüntüler.
- Tek bir sayfa değilse veya gönderi küçük resmi yeterince büyük değilse, varsayılan başlığı gösterecektir.